|
Part 2: Surface properties |


How to use your GRASP surface files in Pov4GraspPart 2: Surface propertiesPart 1 Part 2 Part 3 Part 4
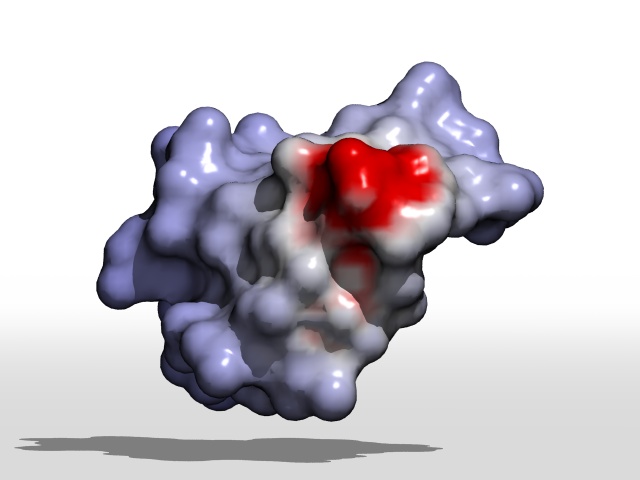
First we're going to map the electrostatic potentials on the surface, introducing the colored_by and the verbose options:
The colouring scheme is the default for this property: lowest values are colored red, intermediate are white, and highest potentials are blue. Here we see almost only the white color, with a single touch of red for what is propably a negative charged residue. The verbose option prints messages including the range of values that corresponds to the selected property. This range is quite large, so let's specify another one as you would probably do within GRASP. This is as simple as adding the range option:
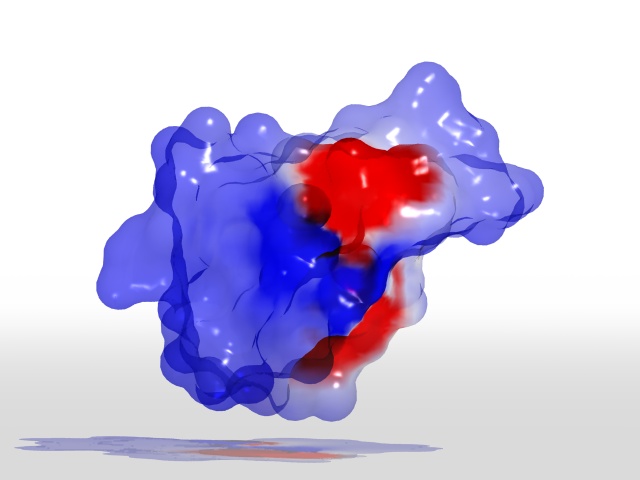
As in GRASP, setting a range of low values (almost) centered around zero will dramatically enhance the associated colors. Don't forget to write the range as a POV-Ray vector, including the "<" and ">" signs. Now suppose we want to show the structure of the protein inside the surface colored by its electrostatic potentials. In GRASP you can specify only three amounts of transparency (¼, ½, and ¾) for the whole surface, while here it's possible to specify any amount. Furthermore, in POV-Ray (and Pov4Grasp) there are two kinds of transparency: filtering and transmitting (see the next part for comparison). The standard way in POV-Ray for changing the transparency of an object consists in specifying a pigment{color rgbf ...} for a filtering transparency (or rgbt for transmitting transparency). However, in Pov4Grasp, a surface property is not treated as a normal object texture, so we cannot use the same rule. Instead, transparency is given with filter or transmit statement:
Note that the "direct" use of filter or transmit is not allowed in a standard POV-Ray object. These keywords are normally used in the context of color definition. Nevertheless they are appropriate here to set the transparency amount of our grasp_surface. Using a pigment{color rgbf ...} is actually useful for getting a more realistic picture of the surface. Indeed, there's something strange in the previous example: projected shadows are completely dark ! To get correct shadows casted by the semi-transparent object, we can then use the pigment definition:
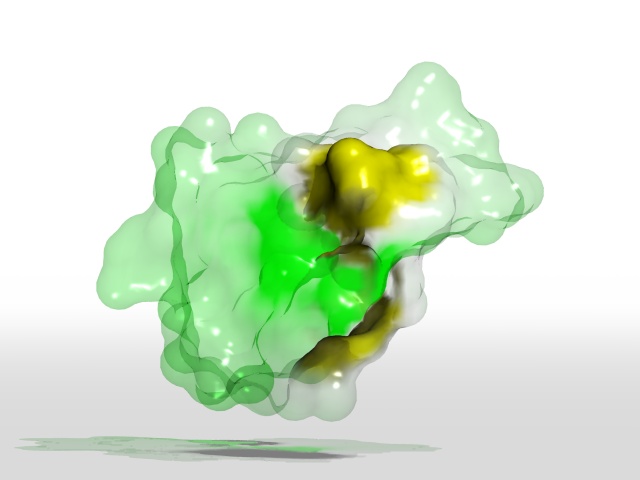
Here we used a white color with transmit value of 1, which can be abbreviated with rgbt 1. The color is not important by itself, only a non-null filter or transmit (or both) is required. In fact, the same mecanism must be used with a standard mesh object in POV-Ray, since different textures (e.g. transparent or opaque pigments) can be assigned to individual triangles. Finally, the rendering time of the picture will be relatively longer than casting dark shadows as above. Now that we're able to get a transparent surface which casts correct shadows, it's time to see how to specify colors that will replace the default ones for the selected property. As in GRASP, three different colors might be specified to match the property range. Simply add a gradient option followed by the colors definitions:
Here we replaced the red color by a yellow one, and the blue one by green. The yellow color is opaque, while the others are made partly transparent through either transmit or rgbf (filter) statements. Hence, using a color gradient also allows to define variable amounts of transparency depending on the property values. The filter 0.1 given in our example for the whole surface is simply ignored in this case. Note that there would be a syntax ambiguity if we decided to place this filter statement afterwards the color gradient: it would be considered as part of the last color definition. So you should not specify a whole transparency together with a gradient option. This colouring scheme can be used for the other GRASP properties that involve a color range, such as the curvatures also available in our surface file. Only one property does not behave the same: the surface discrete colors property, that is described in the next section.
|